Introduction
When reading books or articles, you may want to systematically manage the notes you’ve written. Currently, there are many excellent knowledge management tools available.
- Confluence
- Notion
- HackMD
- Boost Note
There are countless tools when you also include mind mapping tools. I am a minimalist and has the following preferences:
- Manage personal notes like code on Github
- View notes in a mind map format from the web
- Use a free tool instead of a subscription-based service
Thererfore, I came up with the idea of creating a custom personal knowledge management tool. As a result, I only used a 15-line shell script, GitHub Actions, and the Markdown mind map conversion tool Markmap to create it.
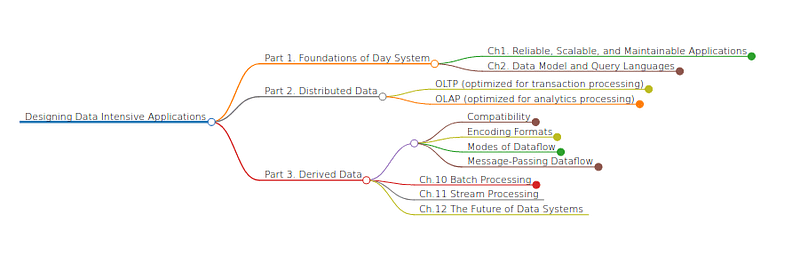
By clicking on the items, you can view the mind map for each note.

You can find the source code here
From Markdown to Mind Map
I have a habit of writing notes in Markdown and managing them on GitHub. However, when notes become too long or have deep nesting, they can become slightly difficult to read. Therefore, I wanted to convert the Markdown content directly into a mind map.
When I searched online, most mind map tools are either paid or have limited free versions. While thinking about how nice it would be to have a simple, user-friendly, and free mind map tool for engineers, As I result I found a fantastic tool called Markmap. It converts Markdown into a nicely formatted HTML mind map.
https://github.com/markmap/markmap
Using it is as simple as executing two commands:
npm install -g markmap-cli
markmap note.md
It’s also nice that you can install a VSCode extension to preview the mind map.
Deployment
Since the I want to access my notes anytime and from anywhere, it is necessary to deploy the HTML converted by Markmap to a web server. While there’s no problem deploying to cloud providers like Heroku, I thought it would be simpler to keep everything within GitHub, so I decided to deploy to github pages. For instructions on how to use github pages, please refer to the official documentation.
At first glance, it may seem that all you need to do is insert the mind map’s HTML path into index.html in a list format. However, you can’t access the file system with just JavaScript, so you inevitably need to use Node.js. As simplicity is the principle for this project, I prefer not to keep Node.js-related files in the repository as much as possible. In other words, I don’t perform the steps of executing Markmap and creating index.html locally. Instead, I utilize the power of GitHub Actions to accomplish this easily.
Preparation
First, prepare an index.html.sample file. In JavaScript, create a list (<li></li>) using the retrieved mind map paths. Using a front-end framework would be overkill, so I decided to manipulate the DOM directly. The HTML_FILE_LIST will be replaced later with a shell script. By using a shell script, you can obtain the HTML paths without using Node.js
The details of the CSS won’t be explained here, but you can check them in the repository.
<!DOCTYPE html>

<html>
  <head>
    <title>Mindmap Wiki</title>
    <meta charset="UTF-8" />
    <link rel="stylesheet" href="style.css" />
  </head>

  <body>
    <div style="width: 600px; margin: 0 auto">
      <h1>Mindmap Wiki</h1>
      <ol class="gradient-list" id="list"></ol>
      <script>
        let data = [HTML_FILE_LIST];
        let list = document.getElementById("list");

        data.forEach((item) => {
          let li = document.createElement("li");
          let link = document.createElement("a");

          link.setAttribute("href", `${item}`);
          link.setAttribute("target", "_blank");
          // ./dist/sub/hoge.md.html -> hoge
          let title = item.split("/").slice(-1)[0].split(".")[0];

          if (title.includes("_")) {
            title = title.charAt(0).toUpperCase() + title.slice(1);
            link.textContent = title.split("_").join(" ");
          } else {
            link.textContent = title;
          }

          li.appendChild(link);
          list.appendChild(li);
        });
      </script>
    </div>
  </body>
</html>
Running Markmap
Now, let me explain the 15-line shell script mentioned multiple times. First, create a directory for saving the HTML files and then find the paths of all .md files.
#!/bin/bash
mkdir -p ./html/tech ./html/nontech
files=`find ./ -type f -name "*.md" ! -name "README.md" ! -path "./node_modules/*"`
Run Markmap on each .md file. Since managing permissions can be complicated, it’s convenient to install Markmap in node_modules/.bin instead of globally.
for file in $files;
do
  output_file="${file/md/html}"
  echo "transforming $file to $output_file"
  node_modules/.bin/markmap $file -o $output_file.html --no-open
done
Creating index.html
Find the paths of the generated HTML files and replace the HTML_FILE_LIST in index.html.sample. Since you need to include double quotes in the path, using sed for replacement didn’t work well. In this case, I gave up on sed and used awk instead.
Workflow
By running the above script on GitHub Actions instead of locally, you can save time setting up the environment. Now, let’s take a look at the implementation. Nothing is particularly hard.
- Install
markmap-cli - Execute the previously created shell script
md2mindmap.sh - Use the third-party action
github-push-actionto push the generated HTML files to the repository
name: Build Minadmap

on:
  push:
    branches:
      - "master"
    paths:
      - "md/**"
      - "./.github/workflows/build.yml"

jobs:
  build:
    runs-on: ubuntu-latest
    container: node:16

    steps:
      - uses: actions/checkout@v2

      - name: Install dependency
        run: npm install markmap-cli

      - name: Run convert script
        run: bash md2mindmap.sh

      - name: Commit files
        run: |
          git config --local user.email "41898282+github-actions[bot]@users.noreply.github.com"
          git config --local user.name "github-actions[bot]"
          git add .
          git commit -m "Add changes" -a
      - name: Push changes
        uses: ad-m/github-push-action@master
        with:
          github_token: ${{ secrets.GITHUB_TOKEN }}
          branch: ${{ github.ref }}
When you create, edit, or delete a .md file locally and push it to the master branch, the GitHub Actions pipeline is triggered, and the mind map is automatically deployed to username.github.io.
That’s it!
Drawing on the wisdom of predecessors, I created a Simple, Tiny, and Free personal knowledge management tool with just a 15-line shell script. With the most basic knowledge of Git and GitHub, it is possible to build your own knowledge management tool at zero cost. Please feel free to clone the repository and try it out for yourself!